Nitty Gritty by Ron Hoess

Nitty Gritty by Ron Hoess

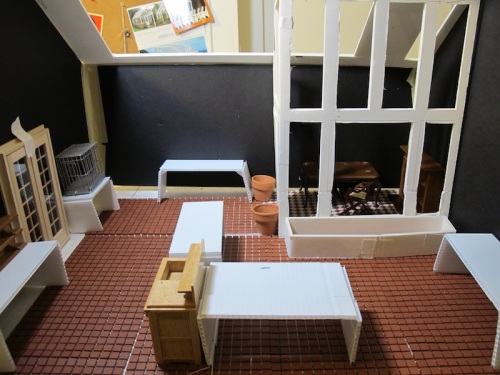
While we blog a lot about structures, plants, details, etc. on this site,  I thought I would just say a few words about one of the more mundane but important aspects of displaying at the Flower Show. If you have have carefully looked at the diagram for the display wall, you will notice that a shelf is provided for resting the display box on. It is 12” below the lower edge of the window.

Miniature Settings View

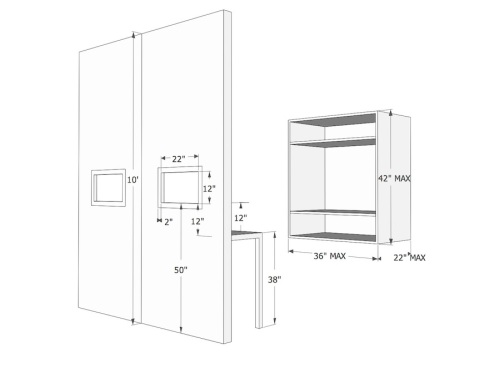
No one builds a box with a foot of dead space below the actual display so you need something that is going to raise the box so that the bottom of your display is level with the lower edge of the window opening. People solve this in a variety of ways.  Sometimes it’s just scrap wood like 2×4’s that are put under the box to raise it up.  I find this a haphazard approach for displaying something that you have worked on for the last nine months and I would like to suggest a fairly simple solution that I have used the last few years.  What I did was construct a small table with adjustable legs that I placed on the shelf with my display box on top. The top of the table is a piece of 1/4” plywood 36” x 22”.  The legs are made from 2”x 2” lumber.  When you cut the legs you will need to do a little calculation.  The objective is to bring the bottom edge of your display to within plus or minus 1” of the lower edge of the window.

platform

leg

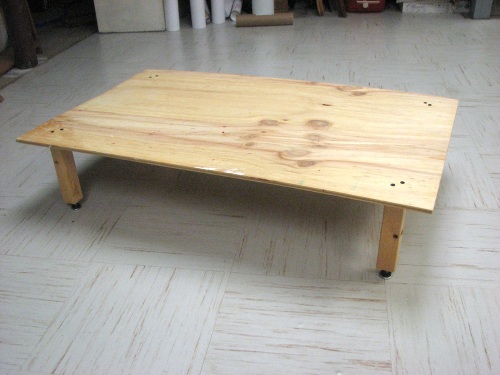
Usually my display box had 2” of dead space below the floor of the display to accommodate plant tray.  You also need to add in the thickness of the wood both from the box itself, the floor of the display and the table top.  I settled on 7” for the length of the legs. Before attaching the legs to the table, I drilled a hole in the bottom of each leg and screwed in metal feet, you can find these at Home Depot, Lowes or any hardware store. These are adjustable so that you can raise or lower the table plus or minus 1” by simply adjusting how far in or out the metal foot is.  The other nice feature is that if the shelf for the display is not perfectly level, by adjusting individual feet you can make sure your display is perfectly level.  While a little work is required to make this table, it sure beats scrounging around the Flower Show on set-up day looking for the the proper sized piece of wood to raise up your display.

Back from the Future: More Laser Cutting

Back from the Future: More Laser Cutting

I spent many hours at NextFabStudio laser cutting hundreds of pieces for my miniature Hogwarts greenhouse. I am quite sure 80% of what I cut was not necessary but it was fun trying different things.

LaserCutting1

Many thanks to Greg, my laser cutting machine babysitter supervisor who taught me, among many other things, to lightly etch the name of each piece onto the piece before cutting. This way, when I am faced with the hundreds of pieces I have cut, I have some possibility of actually putting them together.

LaserEtching1

And, of course, there are more plant signs, this time made smaller and more to scale.

RepottingSign

Fire proofing 2

Fire proofing 2

As we are building the boxes or frames to house our miniature settings, we have to remember to treat the wood with a fireproofing chemical. I wrote a blog about this last year but it is worth repeating now. I have just begun cutting the wood for my box and I am adding the flame retardant Flamex to my primer.

I purchased a small bottle (8 ounces) online at RoseBrand.com, a theatrical supply house. Last year I got the same thing at Philadelphia Theatrical Supply, just down the street from the Convention Center.  Their info online is: http://www.ptsonline.biz/

Here is what it looks like:

Add all 8 ounces to a gallon of paint or put a proportional amount into smaller amounts of paint. Roll it on with a roller or paint with a brush. It doesn’t have to look good (this is the side that is inside our prep room) but it  has to be done because we fill out a form that certifies we have done this. Besides, if there is a fire, we don’t want the miniatures to make it worse!

One Step Forward, Two Steps back…

One Step Forward, Two Steps back…

An update on the work on my entry for the Flower Show. My original title was “Sprout’s Greenhouse: Revenge of the Mandrakes” and it was going to feature crazy little mandrakes running around wreaking havoc on the greenhouse from Harry Potter. I am still doing the greenhouse (as you will see below) but I am going to put less emphasis on the chaotic mandrakes (partly because I haven’t mastered the 3D design program and 3D printer I need to make them). My new title is simpler: “The Herbology Greenhouse at Hogwarts.”

What I have been working on is perfecting my skills with a laser cutting machine. I joined NextFab Studio in Philadelphia and after several classes I can now work on the laser machine (as soon as they open up again: they are moving to a new space). Laser cutting is perfect for the greenhouse because of all the windows that need to be cut in the walls and roof.

I started developing the ideas by doing a mockup in foam core board (I think a lot of us do this). This gave me a sense of the proportions and also the pieces I would need. I didn’t cut out any of the windows but just set the locations of the walls and the potting tables that I have to make. I also decided to give Professor Sprout, the Herbology instructor, an office in the corner.

I ended up designing for six 24in x 48in sheets of 1/4 inch plywood and two 12in by 24in sheets of 1/8 inch plywood. It was an amazing amount of work, all done in Adobe Illustrator. The designs had to meet the specs of the laser cutting machine as well as fit all together at the end.

IMG_3244
Mockup of Sprout’s greenhouse and her office tucked in the corner
IllustratorFile1
In Adobe Illustrator, each piece that needs to be cut is measured and drawn. The color coding indicates the order of the engraving of designs and the cuts.
Sign designs
I designed a series of signs indicating the names of the magical plants.
The Illustrator files become laser cut signs like these.
The Kapa Case

The Kapa Case

Kapa is the bark cloth made in Hawaii. The display of this in the museum has some miniature kapa sheets I made. Today I made a few ancient kapa beaters which are like small bats, four-sided, with textures on each side.  Here are mine, and the case is now lit!

Miniature kapa beaters
Textures are burned into the wood
The lit case, with the beaters and a roll of kapa
Some mini artifacts

Some mini artifacts

My eyes are strained and my hands are permanently stained and glued, but I have made some interesting replicas of the Hawaiian artifacts found in the museums mentioned in this blog. Here are some examples and some of the work involved in getting them done.

The most fun was working with miniature gourds (called Tennessee Spinner Gourds: Cucurbita pepo); you can buy them online, including at Local Harvest). They are a bit expensive so I also bought some seeds to grow my own next year. I cut them open with a Dremel drill and it created a nice burnt edge. I painted them with several different colors that I wiped off immediately to give a stained look and then waxed them (using Museum Wax) to give a realistic surface (which on a real gourd would probably be burnished). Several of the water bottle shapes are tied with cords that are used to carry or hang them. The cords are embroidery thread dyed with black tea and then stained with paint.

Tennessee Spinner GourdsCurbita pepo

Using Dremel Cutter

Surprise: There are good seeds inside!

Wire brush cleans inside

Staining the gourds

Museum wax used to coat gourds but also to secure miniatures in a display

A pot

A bowl

Gourd water bottle with handle

Another water bottle with a hanger

Mini gourd drum (Ipu Heke)- the top should be smaller but I didn’t have a gourd small enough

Adding the cord hangers was not easy with my big hands

I made some miniature kapa sheets (called tapa in other parts of the Pacific). I used thin sheets of mulberry paper kindly ordered for me by the Merion Art and Repro Center in Ardmore. Real kapa is made from the mulberry plant too. I painted and stamped it, using some traditional Hawaiian motifs but not directly copying any one piece. These sheets are about 3 inches wide. I dyed the sheets (which were white) with black tea.

Finally, it was back to the feather cloak which still has only a thin layer of feathers. I started adding tiny feathers for the next layer using “Mod Podge” (instead of glue) this time. A much better approach.

And so, back to work!

Fire proofing

Fire proofing

The one thing that stumped me last year (my first in the Flower Show miniature settings) was that we had to fireproof the wood we used to build our displays. No one told me how to do this and it was all very vague and mysterious. When I finally figured it out, just days before the show was to open, I had to hastily paint all my wood with the fireproofing additive. Now that I am wiser and older, I am adding the “Rosco Flamex PA” (paint additive) to my primer.  I purchased a small bottle (8 ounces) online at RoseBrand.com, a theatrical supply house. Last year I got the same thing at Philadelphia Theatrical Supply, just down the street from the Convention Center.  Their info online is: http://www.ptsonline.biz/

Here is what it looks like:

Add all 8 ounces to a gallon of paint or put a proportional amount into smaller amounts of paint.

The Quest for Artifacts: Philadelphia Miniaturia

The Quest for Artifacts: Philadelphia Miniaturia

This weekend is one of the largest miniature shows on the east coast, Philadelphia Miniaturia, which is held not in Philly but in Cherry Hill, N.J. The show featured many high quality artists.

I was searching for object that could work in the Hawaiian Culture museum I am building. Not surprisingly, I did not find any Hawaiian themed objects but I did find out that other participants in the Flower Show were also there looking. What I did find were many friendly and helpful people and I was able to buy several turned wood bowls from two different artists. Their wood pieces resembled those I have seen in the Penn Museum collection (see the next blog entry) and in the digital database of the Bishop Museum in Hawaii.

First the wood pieces. I bought two bowls from “RJT Miniatures.” Rob and Kate Tuckham came all the way from British Columbia with their wonderful wood designs for the show and actually had a bowl made of koa, a Hawaiian wood.

I also bought a rimmed bowl from Bear and Lisa Limvere of “Standing People Designs.”

Their works are also beautiful and they were very helpful, showing me a lot of different minis as we tried to find something that was close to the shape of real Hawaiian artifacts. I chose this rimmed bowl.